Showing posts with label Darkroom Door. Show all posts

Monday, May 15, 2017

Retiform Stamping Technique - Darkroom Door Sail Away

Hi there everyone, Shaz here!
 I've found new stamping technique, and just had to try - it's called Retiform Stamping.
No idea what Retiform is??? Neither did I!:D
It's great for masculine or feminine cards I've found. Made a Pinterest page on Retiform Technique - over here, 50+ pins...
 Definition of retiform, by Webster: " composed of crossing lines and interstices : reticular, netlike; ... etc... "
Technique can be simple as many are or more complicated as I decided on.
Left is the Darkroom Door Sail Away Stamp set, perfect for this technique.
(What a grand stamp set - see it HERE! at Bec's excellent prices).
 Some basic tips, I thought of:
 *have nice contrasting colour choice, this makes or breaks it. 
* make defined intersecting lines that softly blend out. 
* when stamping images, think about placement and avoid empty space. Have them looking as if they're popping out of intersecting lines, to give more natural look (you'll see what I mean when we come to that). 😉
Template for centre, getting ready to ink centre, staring from edges used thee Distress Inks - Faded Jeans, Stormy Sky, Mermaid Lagoon.
Masked off portions and inked them up in alternating shades. Used Antique Linen, Fossilized amber, Frayed Burlap, with bit of gold glitz, for yellow shades..
Adding Masks (post-it notes) for image stamping, using smaller and larger stamps from DD Sail Away set, plus DD splatter.
Finished Retiform. The white mark is actually a shine not white area. Shine is from tape which was not re-positionable :( am no longer using it for that. I have added matte medium glue to the residue it left and it is now matte and fine :D
Card - take 1 above,  however wanted to re-do the central image!
Card Take 2 you can see below. Partly I like the first card, but felt too little contrast with central image, hence remake of it! It is what it is now :D

Lawn Fawn So Much to say ... birthday greeting.
Distress inks -
Antique Linen, Fossilized amber, Frayed Burlap,
Faded Jeans, Stormy Sky, Mermaid Lagoon, Salty Ocean.
Ranger Archival Ink for navy stamping -Cobalt  and Sepia.
(if you see something that is not listed in store, then ask Bec via email to see if she can order it in for you! )

Thanks for popping over, especially a big thank you if you say hi to let me know you've been by!

 Oh and dont forget to  join in the Bizzy Bec's Anything Goes challenge for May HERE..  someone has to win that prize.

Sunday, January 15, 2017

Darkroom Door - Surfboards Photo Stamp Gatefold card

Hi there everyone, Shaz here it's the 15th, halfway through month, so that means a Design Team post. 😊
Today I'm sharing a step by step card with Darkroom Door Surfboard Photo Stamp.
 Here is peek of my card... loved the result.
As I planned on water colouring part, stamped about four images in mixture of waterproof Archival inks, Jet Black, Sepia, Cobalt. Stamped one in Cobalt, which used for main image, others were in mixture of them swiped over the stamp. Used deep blue image on sky + sand background. Used mixture of *Distress Ink pads, on the sky and sea, Salty Ocean, Denim Blue, Stormy sky. On sand used Antique Linen, Mustard seed+ a little Vintage photo. (* added Distress inks in photo - right front, to piece of white laminated card to colour with which to colour)
Intended to 3D the Surfboards, mostly surfboards have some sort of colour on it, but there are quite a few neutral ones too.These were calling for colour 😊
Added cut out Surfboards, shaped them, then glued. Front two were added on top of first lot. Once glue was dry, added glossy accents to the Surfboards, they looked like the real thing then.
I really loved this image, it was so much fun to play with it. To finish the image I dusted it lightly around the edges with DI Vintage Photo, to age the edge of card which was stark white.
Stamped the Happy Birthday with Lawn Fawn stamp Set -  "So much to say" on cream card in Onyx Black Versafine Pigment ink pad, and clear embossed. Hand cut a greeting banner and backed in black card.
Embossed a sheet cream, similar to greeting banner, with a favourite folder for male cards, Sizzix Dot Matrix embossing folder. Smooched it with Distress ink Antique Linen, I use this colour a lot. Then took a snippet of turquoise and embossed it with large embossing folder.Assembled card.

Well, that's it for today... dont forget to join in Bec's Anything Goes January challenge .. you might win the prize :D
 Shaz in Oz.x
PS more details on my blog post - here

Thursday, December 15, 2016

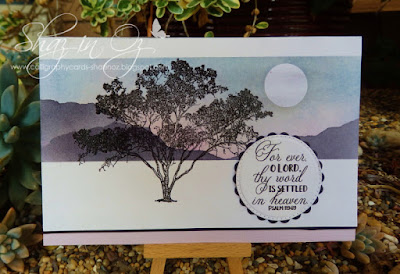
Masking with Darkroom Door Gum Trees Stamp Set

Hi everyone, Shaz here.
it's time again for my mid-month post on Bizzy Bec's Design team, and today I'm revisiting a great stamp set from Darkroom Door - Gum Trees.
I love this set it has two great tree stamps - used both of them over on this post here.
So today I am using different style - previous one was a brayered scene, and this is ink duster scene, with larger of tree simply embossed in front of a masked scene.
On right is the first one I did, but I stamped the "Remember your roots" slightly crooked by 2mm or so (card for family not living in Oz). I cant handle crooked. So started again!
Mask with paper and repositonable tape - two masked pieces top and bottom (on the second one I stamped the tree first, but decided it looks better stamped afterwards, just looks stamped fresher).
I always lay down a base layer of ink when doing any sort of inking whether blending or brayer work - use neutral shade like Distress Ink - Antique linen here.
TIP:
I
f you lay a base layer, the following layers blend more smoothly.
Brushed on ink, however you can use blending tool too. Used some Memento Bahama Blue, Grape seed.
Then added some hills, with a torn piece of scrap paper to give rough shape of hill and inked this up twice with archival Black ink. Stamped the trees and text in Versafine Black Onyx, my favourite black ink and clear embossed.
So here are the two cards, didn't waste the first one, I merely covered the offending crooked sentiment with a free digi. Die cut it with Memory Box Pinpoint circles, and the Spellbinders scallop circles, love how them MB dies fit the SB circle dies.
  I really loved these cards, the Darkroom door stamps were so great to stamp with.
The "Remember your roots " word stamp is part of the
Darkroom Door Gum Trees set.

Thanks so much everyone for popping over and saying hi!
...and dont forget to pop over and join in Bec's Anything Goes December challenge .. you might win the prize :D 
Shaz in Oz.x

Thursday, September 15, 2016

Watercolours + Embossed Darkroom Door Collage Stamp

Hi everyone - Shaz here, just popping in with quick post of some watercoloured poppies for Bizzy Bec's!
I bought from Bec this *Darkroom Door collage stamp, which I embossed in gold EP, and heat set. Then painted image in watercolour, using the Distress Inks, smooched on a ink block and on laminated sheet. * this stamp not on Bec's site, but she can get it for you! at a great price!
I really love this card. It looks wa-aaay better in real life, sadly sometimes photos never do a card justice this is one of them!
Used Glossy accents on poppy, mounting it on this gorgeous Our Daily Bread die set called "Lacey layered Square Dies" - it is square, but I extended it into rectangle (see tutorial on this here). It can be ordered from Bec.
T
he "smile' stamped greeting is also a greeting from Bec - Lawn Fawn "So much to say" a really great sentiment set!
Background designer paper - Paper Pad "Wild Rose Blackberry Lane", bought from Bec.
 Hope you've enjoyed this post, and it is good to be back again after my illness. Thank you everyone for encouragement, patience and support.
Shaz in Oz.x

Wednesday, June 15, 2016

Darkroom Door Photo Stamp - Surfboards

Hi there - Shaz here with another step by step :D

To the method ...
Stamp the lovely stamp in black Versafine ink and emboss with clear Embossing powder.
I had bought some lovely cheesecloth from Bec and wanted to use it with surfboard stamp, + the Dylusions teal spray, also perfect pearls spray. Has lovely sheen on this, just cant see it.
Here is the dyed cheesecloth (also used it as a stamp while it wet and juicy on some other card to right). It was too dark when done so I wrapped it up like a sausage and put a Rubber band down length of it, like we did for tie dyeing in the '70's. Then wet it all over again with water and took some of the colour out randomly with kitchen paper to get the mixed colour. Let it dry naturally.
Assembled card - Added some real sand from our beach, with some texture paste and masking tape.  Coloured the sky with DI ink and hand made cloud masks. Added the colour to sea with Versamark and Perfect Pearls, and also the surfboards. Turquoise card on left was coloured from cheesecloth stamps above and added some more colour after embossing piece, I added some more inks to highlight. Only needed a third of cheesecloth which was dyed, it was folded over three times. Happy Birthday was stamped in Versafine on cork, and clear embossed.
Loads of shimmer on this card....
Products used:

*Ranger Perfect Pearls PPP21803 Aged Patina 
(available for order, as are Ranger products - see Bec.)
*Cheesecloth (out of stock, but also available through Bec.)
Thanks so VERY much for popping over for peek and chat... 
Shaz in Oz.x 
And please dont forget to go over to Bizzy Bec's Anything Goes Challenge for the month of June, 
please over here too - you may win that prize! 

Friday, April 15, 2016

"Darkoom Door Gumtrees" Male Card Tutorial


Hi everyone - Shaz here!
Another mid month post with a tutoria
l + *brayered male card.
K
ey to brayer work is a light and gentle hand, ie dont attack the paper but caress it. :D
Always build up a light base layer for any good blending of any inks, in any medium - then add the depth of colour once the first layer has dried.
The base colour helps smooth out all other layers. I always brayer on smooth "junk" mail - the soft smooth surface helps in blending.

Used good glossy cardstock, *brayer + dye inks: *Memento Bahama Blue, *Grape seed + Adirondack Peach Bellini, dont have that colour in Memento. Click here for blog post + video with Brayer basics - this is
a good place to begin.
*Bec has or can source these items.
Tore a rough edge with scrap of paper and sponged it lightly with
On a long snippet of cream (cut to size) added *Distress inks as shown (Bec's DI here) with blending tool Antique Linen for base coat then Salty Ocean + Dusty Concord
Embossed a cream piece of card with *Sizzix Dot Matrix folder, added *Salty ocean + *Antique linen mixed randomly rubbing over the embossing.
All side layers together, added bit of twine to overlap them.
(for details on stamps, etc. see my blog post)

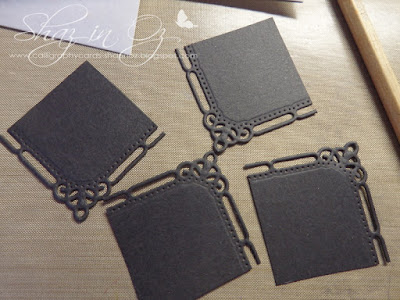
*Spellbinders Marvellous Squares die (link here) cut in black snippet. Cut into four, trim down as shown to make great corners.
 

*Darkroom Door – Gum Trees set, mounted on black card, then added corners underneath.
 Image is stamped in *Versafine Onyx Black, clear embossing powder + heat set.
The "Peaceful" word stamp is part of the *Gum Trees set.*Bec has or can source these items.
 Thanks so much everyone for popping over and saying hi!
...and dont forget to join in Bec's Anything Goes April challenge ..
you might win that prize :D
Shaz in Oz.x 
PS for another great post with male card, check out DT Jackie's brilliant male card with Darkroom door stamps - blog link here!

Friday, May 16, 2014

Seashells

Hello everyone! Kelly from the Bizzy Becs design team here and I wanted to share with you an ATC (artist trading card) I have made. ATC's are small little art works that are 2.5 inches by 3.5 inches and are made to be swapped with other artists. For my ATC I have made a sea theme by using some stamps from Darkroom Door called 'seashells'. I created a pocket on my ATC and cut out some seashells and inked them with distress inks to go inside.


My ATC:


ATC with the seashells out of the pocket:

Sunday, March 16, 2014

Roses Artist Trading Card!

Hello everyone! Kelly here from the Bizzy Bec's design team and I wanted to share with you all an ATC I have made. ATC stands for 'artist trading card' and they are so much fun to make! The only 'rule' with ATC's is they have to be 2.5 inches by 3.5 inches. I coloured my ATC with 3 different glimmer sprays then stamped and embossed the roses stamp over the top. The stamp I have used is 'roses' by darkroom door. Bizzy Bec's now sells darkroom door stamps and there is a large variety so stop by and check out the huge range!